Monday, 29 July 2013

Voyager- Ash (Part 2)

canoe paddles headboard
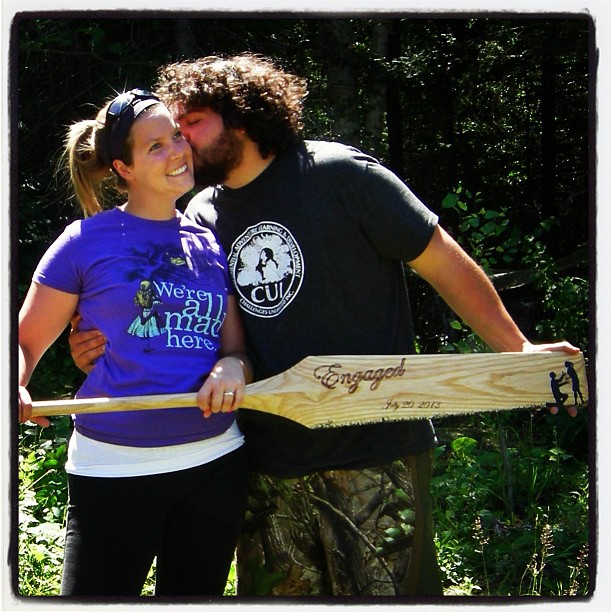
SO .... the paddle is done and the secrets out ! Sarah said yes and the paddle was part of my engagement plan! Sarah and i have recently just bought a house when we were talking about some of the idea we wanted around the house to make it personalized. She brought my attention to this headboard idea. I didn't really want to make a whole bunch of paddles that would never see water and take forever to make,  so instead she requested paddles that would show special dates to us. First Kiss, First house, engaged and etc. 

I decided to make her a paddle (that can be seen in part one of this post) and to surprise her lake side with a ring. I took her down to the cabin by the lake and told her we needed to go check out a fishing spot. We have the only land on the lake the rest is crown so its a nice spot ! We carried the canoe out of its hiding spot and put it in the water. I then told her i had finally made her a canoe paddle. I had place the paddle further so she would have to walk to it allow me to be behind her, as she was pulling the paddle sock off i got onto one knee behind her. She was very surprised and excited ! Once she calmed down a little i gave her my little speech and pulled out the ring. She said yes ! (even with the beard on me ) I could not be happier !

The paddles art is a mix of wood burning and a lil black paint ! It was the right size and all !

With the move coming up i will not be able to get to any of my paddle making stuff but i figure it was a good one to hold me over. 
Thank for reading,

Paul


Thursday, 16 May 2013

Canoeing the Credit River

Hey,

Got a chance to go out on a test run down the credit river for a group we're going to have at work soon ! What an awesome day for it too the sun was out and it was nice and warm.

We started at McNab park in Norval and canoed all the way down to Streetsville Memorial Park. It took us about 4 hours and we only had to get out and walk the canoes a few times.

Dont take a paddle you like !

Awesome run down the credit !

Tuesday, 2 April 2013

Voyager- Ash (Part 1)

Rough blank edges need sanding
Hey Everyone,

So i have been working on stuff.  Its just been at a slower pace, because life gotten busy. I have been working on a Voyager paddle made of Ash. Ash is very strong but a little on the heavy side.

With each paddle i've been making , i'm constantly trying to improve on my skill. For this one i am really trying to make it as light as possible but still getting a perfect balance of strength and lightweight.  I just dont want push to far and create a paddle that will snap under pressure. I am also trying to develops that small ridge in the centre of the blade where the shaft meets the blade. I dont have a convexed spokeshave, so i may use a dowel and sand paper to get that look.

Ridge in the neck of the blade
I also wanted to really take my time with this paddle, its easy when you start to see them take shape to skip a few details or cut corners. Its those thing though that tend to make them extremely special and to skip them takes away from the details.

I also have started to speed up shaping the grip by using the bandsaw to remove large amount of wood at once. I typically use a rasp and spokeshave to do the grip.  With power tools though you can ruin all your work and the paddle with the smallest slip. Its a bit of a risk but if you pay careful attention it can save a decent amount of time, then a little work with hand tools and your done.

Current state starting to look good 
I have a few ideas on the art work and finishing but not sure which one is best. I also was thinking about putting a resin tip on this one. Even though Ash is hard, i like the ability to push off rocks and such without concern of ruin the paddle or wood.

Thanks for reading and as soon as i kick this nasty cold/ flu/ whatever i have, ill get back o work on it !

Paul


Monday, 1 April 2013

Cutting board !

Best layout
Hi all !

Sarah and I recent bought a house, so I thought I would take a few scraps of wood that have been laying around and make a cutting board .

Pre Oil
I used hard maple , walnut , curly maple and paduk . There hardwoods so that the knife won't ruin them to bad . I've been told wood cutting boards aren't the best because of salmonella, but I just wanted a small project .

I lined it all up so that I had the patten that looked the best . I think this turned out pretty good . I then planned the edges so that they would fit together well, without any gaps .

I glued them all using some good glue and clamped all the wood together.

I then planned all the wood down to an even thickness . I rounded the corners with the disc sander and took the edges off so they were just slightly rounded .

Finished product 
I took some badgers hemp oil ( food grade) and covered the board . I did a few layer and that the cutting board !

Super easy project just wish I had a better saw for ripping stock wood . Then I could have made it into a checkerboard pattern.

Thanks for reading !

Paul


Saturday, 8 September 2012

Moose- Pyrography

Hi all,

Still alive ! Summer is always a busy time at work and for the cottage, leaving little time for other things.

I recently had a chance to wood burn a little hanging paddle i picked up for 3 Bucks! (it was clearance i bought the only two )

My girlfriend Sarah recently started teaching and the school shes at call their portables Cabins.

So of course i thought it was fitting to make her a sign for her classroom . I will be adding he last name to the handle later in a nice cursive writing.

I also will be starting on a few new paddles in the near future so stay tuned !

Thanks for reading,

Paul

Friday, 25 May 2012

Cedar- Beavertail ... Birch Bark (Part 2)

Here is part 2 of my Cedar paddle. The concept was something i came up with after seeing people painting paddle shaft funky colours,  and thought to myself if i was to paint the shaft what would i put on it. My favorite tree has always been a birch and i thought that it would be amazing to make a series of paddles and to paint the shafts like the bark of the wood being used. With that in mind i went to buy a bit more wood and of course they were out of birch so i change to cedar, added a sweet Canadian leaf and made the what i call the ultimate Canadian paddle. 

Took quiet a few coats of white, and the i let the brush slide across the grain so that it would be that rough black patches you see on a birch. Its not identical to the trees bark its more cartoon looking, that being said i'm extremely happy with how it turned out! It needs a finish  by Tuesday which is when i plan to test it out, have a canoeing group at work. 

Finished paddle
Concept
As for the Pyrography work i wanted something different from your standard original maple leaf, after i bit of browsing on the net i found something like the one on it but with a few changes .

Hope you enjoy, because I'm very proud of this one.

As normal thanks for reading, 

Paul


Wednesday, 23 May 2012

Cedar- Beavertail ... Birch Bark

Hey everyone ,

Still here ! Sorry for the disappearance.

If the formats weird it's because I'm posting from an iPhone so I'll fix it later when I'm home.

I started the cool painted shaft paddle I was talking about earlier in this blog. It's a my first time working with cedar. Few things you remember quick when working with this wood.... How good it smells, how light it is and how easy it is to "dent" it . when I was craving it I left the whole thing a little thicker in the shaft to make it a bit strong. Cedars soft and light wood. I'm a bit worries I'll get out on the water and snap it if I thin it down to much.


I also added an epoxy tip to the paddle . I use the same method as Mark shows on his blog found here.

I shaped the shaft, thinned the blade down much more then the original blank. If you add the tip to the original blank then thin it down, its just a lot of wasted epoxy. To add the tip ensure you have the shape or the blade you want . Then make a horse shoe with the play dough or soft magic mold (this is what I used) press the paddle in and pull it out . Mark the amount you want the tip to be the remove that amount of wood. When u place the paddle back in there should be a perfect gap for the epoxy to fill and will be what the tip looks like .


When you mixing the epoxy someone told me to add filler so i went to my shop vac and got some sawdust to add. I used a quick 5 min epoxy and mixed it then added the dust until a watery mayo consistency. Then I scooped it into the gap and because it's " watery " , it should fill it just right.

Be sure there is no air bubbles in the epoxy. You can also add a price of rope into the tip to make stronger ( Marks suggestion) , I could wait and there was no good rope around .

Then peel the play dough off and start shaping your paddle !

Think I covered everything so far.

Thanks for reading and now I'm off to the cottage to go canoe and get some fishing in !

Happy Victoria day weekend

Paul

Saturday, 14 April 2012

Birch Bark Moose Call

Hey everyone,

This is not a canoe paddle post, but it's going up anyways. When I was away at Easter weekend at the cabin, I was in the woods and I scared a bull moose out of his bed.

I decided to make the classic birch bark moose call. I found a birch bark tree that was on the ground (do not take from a live tree it can kill them). Find a nice piece on the tree without any knots, cut a a straight line down and around the tree at the top of your line and the bottom. Go over the lines over and over again applying a lot of pressure.  Once you have a good two foot long piece take it and soak it in the bath tub over night. Then get a pot of water, bring it to a boil and steam the bark. By steaming and soaking it, you will be able to move the bark without breaking the bark.

Cut it into a cone shape and punch holes down one side. Roll the cone and line it up the holes with the other side and dot with a marker, where the holes will be on the other side. Punch the holes on the other side, and use a running stitch through the holes. I used leather you can use what you would like.  Throw this in your canoe and practice your call when you're out in the canoe, you will be surprised with how many moose will come out to visit you! If you have a good call in the Fall of course !

Thanks for reading,

Paul

Tuesday, 27 March 2012

Elk Antler Knife

Hey,

When cleaning up the shop,  i found the knife blades i bought before (inspiration Marks post). I have seen buck tines turned into handles when i bought the elk antler this purpose i bought it for.

I cut the grip to a comfortable piece  that fit my hand. I opted not to put a metal piece where the antler meets the tang, i thought the antler was pretty enough.  You can also cut the tang down a bit.

I then used the  belt sander to get that white edged look. Just a light  and quick spin does the trick.

There is a few ways to get the tang into the antler. 

1) Drill two small holes and file the inside until you have a snug fit. Tape the blade , apply epoxy to the inside of the holes and stick the tang in. 

2) Soak the antler for a month in rain water  or creek water until the pithy core can be dented with your nail (softer the better) . Tape the blade, secure it in a vise and slowly insert the tang trying not to move left to right ( you will get a sloppy bind. Once done let it dry and it will be just like epoxy.

3) For the impatient (like me), you can boil it. Same thing as the rain water once you can push you thumbnail in and it forms a dent, you're good to go. Unlike the soaking method if you leave it boiling to long it may become fragile.

I actually did a bit of 1 and 3 . I drilled a hole and filed it out a little and then boiled the antler. Overall the knife feel great in the hand. I will be doing something to cover the little gap between the tang and antler, just not sure what yet.

More detailed instructions at the following sites:

http://www.fieldandstream.com/antlerknife

http://www.ehow.com/how_4540169_make-deer-antler-handle-knife.html

Thanks for reading !

Paul 

Sunday, 25 March 2012

Hudson Bay Voyageur- Maple - Pyrography


 Hey Everyone,

Sorry for the long times since the last post. Just lack of time and such.  I found a bit of time today to finish the artwork i started awhile ago on my last paddle. I have always loved owls so, it seemed fitting to try this for the first time on a paddle.

I had also bought a tiny pack of paint and brushes ( Amazing sale !) as you can see below, i painted the eyes on the owl to make them pop !  If you do this (add paint) be sure to do it in sunlight, I kept layering the yellow to darken it. When i took the paddle to the sunlight it was way brighter then in a normally lit room. 

I think i could have shaded the owl more then i did. I was under the impression that when you finish the paddle the image that is burned on darkens. I think it did the opposite, some of the detail faded. 
It was finished using a pre stain and then Tung oil. I had planned to use the Badger oil i had picked up at the adventure show but as i applied it to the pre stain, it did the same effect as water and oil. I wipe it off and applied the Tung oil, I'm very happy with the paddle. 

Also note that after going to the adventure show i thinned down the shaft even more, after seeing the other custom paddles i knew i could push it and thin it some more.

More posts to follow on the cedar paddle i have been marking out in a bit !

Thanks for reading !

Paul

Monday, 27 February 2012

Shopping Op

Hey Everyone,

I had a chance to go to the Outdoor Adventure Show this weekend and picked up a few thing. My favorite thing bought was a crooked knife from Canadian outdoor equipment The crooked knife is the traditional woodworking tool of the First nations and Inuit . Its like a one handed draw knife that is used in one hand as you hold the paddle with the other hand. 
  
I also picked up Badgers paddle and Gunnel Oil which is 100% All Natural Hemp Oil that has no harsh fumes and is even food safe. I'm excited to finish the next paddle with this finish and possible even a cutting board which i plan to glue together some extra pieces together to make one. 


Lastly i bought a piece of Elk antler (sold as a dog chew) from Urban Dog Products. I am not sure if i should use this one of the knife blades i had from before or if i should save it and make a crooked knife of my own. It does have a very nice feel in the hand, so either choice it will be pretty good. When i was at the booth the guys told me someone had bought a piece to be the tip of a paddle, which i thought would be interesting.


Thanks for reading


Wednesday, 22 February 2012

Pyrogrpahy - Black Capped Chickadees

Hey Everyone,

Had a chance to do a bit more Pyrography work over the past few days. I picked a pattern from Sue Walters book . To transfer the pattern to the wood i printed it out on a laser jet printer (ink jet doesn't work ) flipped it over so ink was touching the wood and took a clothes iron to the back of the paper. The heat melts the ink and the ink sticks to the paper.

This piece came together pretty quick !

Hope you enjoy!


Thursday, 16 February 2012

Pyrography - Eagle (Part 2)


Had a day off today because I'm the lucky one that gets to work all weekend, so I did a little bit of work on the Eagle (finished it actually).

I continued the shading the feathers, but this time I switched the tip I was using to a medium shading spoon.  While doing the feathers, I would shade a thicker line on the outside of my original line to add a shadow and create layers among the feathers.

I dotted just underneath the eye using the skew tip to make tiny dots. I then uses a thicker tip to put a darker outline among the dots. Finally, I added a few thin hairs.

I lightly shaded lines among the beak at select parts; I was luckily enough to be able to study my African grey parrot's beak for this.  

For the eye I shaded it in using different levels of heat, especially the iris  (light heat). I then took a knife and scraped the tip across parts to ensure there were no blotches in this very important spot (can make or break your piece).  Last but not least I scraped a "glint" into the eye to bring it to life.

And that's it!

Start
Finished


                            ->

Monday, 13 February 2012

Hudson Bay Voyageur - Maple

Rough grip with Heartwood
Hey everyone ,

Started on a paddle early last week and got on a roll this weekend. The paddles shaped and sanded but I'm not sure how I'm going to finish it. I spoke in my last post about a painted shaft but not sure if this is the paddle for it.

 First time working with maple and i like it ! Its Hardwood and its a bit heavier than i thought it would be. This board had a little piece of darker heartwood running through the middle giving it a great look down the center of the grip and shaft. 


I tried a different grip and found that this design was a lot of fun to carve, looks pretty and feels great when holding onto the paddle.
Blank

Electric planner makes quick work
When i started the blank this time, i was careful to stay an 1/8 of an inch outside the line i drew for the blank. I have a cheapy band saw and find it wanders a lot. The last few paddles i would end up cutting in to close, this time i cut outside and used the stationary belt/disc sander to true it to the line.

Since i sanded out the edges,  i ended up with a smooth blank, if the blanks wavy then the shaft may be as well.

I unfortunately knicked the side of the blade so had to thin it just a touch more then the design called for, resulting in a thin paddle blade that was already thin enough. 

Then this should be a Muskrat tail not a Voyageur!
So decisions, decisions , decisions.....

Do i paint the shaft and still get the heartwood on the grip, wood burning something onto it (still not that comfortable with the shading skill yet tho), paint on the blade or leave it be and seal it with oil or poly.


Let me know what you think ! and Thanks for visiting.


If this is a beaver tail
And this is an Ottertail

Tuesday, 7 February 2012

White Water - Padauk and Ash (Part 2)

After what seems like forever, I am finally done this paddle.

After my last post I was still unhappy with a lot of attributes of the paddle. Still was to heavy (even for a white water paddle) and it seemed bulky.

With that begin said I planned a lot more off the blade taking time not to rip a chuck out at this stage. I then took it to the stationary belt sander to thin down the spots that the planner wasn't getting. I find that the electric planner leaves it thinner at the tip and thicker where it ramps up to the shaft.

I also was not happy with the feel of the grip. The original pieces of Padauk and Ash were two inches think, which ment the grip was huge. Toot it to the belt sander as well and thinned it down . When you creating this T grip the best thing to do is to use the belt sander to get a shape on the top of the grip. Then use a thin strip of 50 sandpaper hook it under the T and grab the ends in different hands, then pull back and forth on it ( hope this makes sense) . I found it shaped the grip faster then the rasp.
Whole Paddles like this

I also went back and with the spoke shave and took more off the shaft. Since its Ash you can really thin it's down a lot well still retaining strength.

I didn't want to put a pattern on the blade (thought it would take away from the laminated process) but it still looked a bit to plain . I had heard that Padauk was used for dye and remembering that blue ash paddle from before I got an idea. I took a wet rag and opened up the shop vac with the red dust and rubbed the rag in it. I took the rag and rubbed it against the grain. The red dust got caught in only deep grain pattern of the ash giving this amazing effect ( see pic ) without the need for stain.

I gave the paddle a final few sandings working with a finer sandpaper each time. When finished the sanding process, it was on to the finish.

I heard that Padauk can loose its color if you don't use a uv inhibitor. I bought some teak oil ( said uv inhibitor right on the label ) and applied it. Very quick and easy to use.

Hope you enjoyed !

Now on to the next paddle, I have a plan to do a very original painted shaft. More to follow once I get over this cold !