Monday 29 July 2013

Voyager- Ash (Part 2)

canoe paddles headboard
SO .... the paddle is done and the secrets out ! Sarah said yes and the paddle was part of my engagement plan! Sarah and i have recently just bought a house when we were talking about some of the idea we wanted around the house to make it personalized. She brought my attention to this headboard idea. I didn't really want to make a whole bunch of paddles that would never see water and take forever to make,  so instead she requested paddles that would show special dates to us. First Kiss, First house, engaged and etc. 

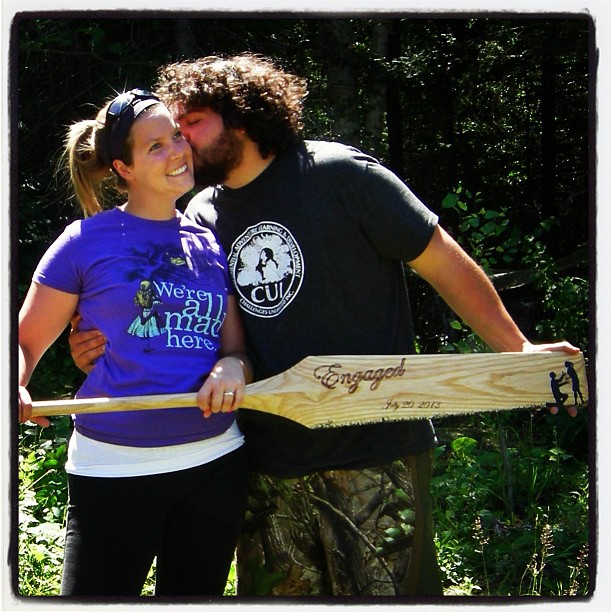
I decided to make her a paddle (that can be seen in part one of this post) and to surprise her lake side with a ring. I took her down to the cabin by the lake and told her we needed to go check out a fishing spot. We have the only land on the lake the rest is crown so its a nice spot ! We carried the canoe out of its hiding spot and put it in the water. I then told her i had finally made her a canoe paddle. I had place the paddle further so she would have to walk to it allow me to be behind her, as she was pulling the paddle sock off i got onto one knee behind her. She was very surprised and excited ! Once she calmed down a little i gave her my little speech and pulled out the ring. She said yes ! (even with the beard on me ) I could not be happier !

The paddles art is a mix of wood burning and a lil black paint ! It was the right size and all !

With the move coming up i will not be able to get to any of my paddle making stuff but i figure it was a good one to hold me over. 

Thank for reading,

Paul


Thursday 16 May 2013

Canoeing the Credit River

Hey,

Got a chance to go out on a test run down the credit river for a group we're going to have at work soon ! What an awesome day for it too the sun was out and it was nice and warm.

We started at McNab park in Norval and canoed all the way down to Streetsville Memorial Park. It took us about 4 hours and we only had to get out and walk the canoes a few times.

Dont take a paddle you like !

Awesome run down the credit !

Tuesday 2 April 2013

Voyager- Ash (Part 1)

Rough blank edges need sanding
Hey Everyone,

So i have been working on stuff.  Its just been at a slower pace, because life gotten busy. I have been working on a Voyager paddle made of Ash. Ash is very strong but a little on the heavy side.

With each paddle i've been making , i'm constantly trying to improve on my skill. For this one i am really trying to make it as light as possible but still getting a perfect balance of strength and lightweight.  I just dont want push to far and create a paddle that will snap under pressure. I am also trying to develops that small ridge in the centre of the blade where the shaft meets the blade. I dont have a convexed spokeshave, so i may use a dowel and sand paper to get that look.

Ridge in the neck of the blade
I also wanted to really take my time with this paddle, its easy when you start to see them take shape to skip a few details or cut corners. Its those thing though that tend to make them extremely special and to skip them takes away from the details.

I also have started to speed up shaping the grip by using the bandsaw to remove large amount of wood at once. I typically use a rasp and spokeshave to do the grip.  With power tools though you can ruin all your work and the paddle with the smallest slip. Its a bit of a risk but if you pay careful attention it can save a decent amount of time, then a little work with hand tools and your done.

Current state starting to look good 
I have a few ideas on the art work and finishing but not sure which one is best. I also was thinking about putting a resin tip on this one. Even though Ash is hard, i like the ability to push off rocks and such without concern of ruin the paddle or wood.

Thanks for reading and as soon as i kick this nasty cold/ flu/ whatever i have, ill get back o work on it !

Paul


Monday 1 April 2013

Cutting board !

Best layout
Hi all !

Sarah and I recent bought a house, so I thought I would take a few scraps of wood that have been laying around and make a cutting board .

Pre Oil
I used hard maple , walnut , curly maple and paduk . There hardwoods so that the knife won't ruin them to bad . I've been told wood cutting boards aren't the best because of salmonella, but I just wanted a small project .

I lined it all up so that I had the patten that looked the best . I think this turned out pretty good . I then planned the edges so that they would fit together well, without any gaps .

I glued them all using some good glue and clamped all the wood together.

I then planned all the wood down to an even thickness . I rounded the corners with the disc sander and took the edges off so they were just slightly rounded .

Finished product 
I took some badgers hemp oil ( food grade) and covered the board . I did a few layer and that the cutting board !

Super easy project just wish I had a better saw for ripping stock wood . Then I could have made it into a checkerboard pattern.

Thanks for reading !

Paul


Saturday 8 September 2012

Moose- Pyrography

Hi all,

Still alive ! Summer is always a busy time at work and for the cottage, leaving little time for other things.

I recently had a chance to wood burn a little hanging paddle i picked up for 3 Bucks! (it was clearance i bought the only two )

My girlfriend Sarah recently started teaching and the school shes at call their portables Cabins.

So of course i thought it was fitting to make her a sign for her classroom . I will be adding he last name to the handle later in a nice cursive writing.

I also will be starting on a few new paddles in the near future so stay tuned !

Thanks for reading,

Paul

Friday 25 May 2012

Cedar- Beavertail ... Birch Bark (Part 2)

Here is part 2 of my Cedar paddle. The concept was something i came up with after seeing people painting paddle shaft funky colours,  and thought to myself if i was to paint the shaft what would i put on it. My favorite tree has always been a birch and i thought that it would be amazing to make a series of paddles and to paint the shafts like the bark of the wood being used. With that in mind i went to buy a bit more wood and of course they were out of birch so i change to cedar, added a sweet Canadian leaf and made the what i call the ultimate Canadian paddle. 

Took quiet a few coats of white, and the i let the brush slide across the grain so that it would be that rough black patches you see on a birch. Its not identical to the trees bark its more cartoon looking, that being said i'm extremely happy with how it turned out! It needs a finish  by Tuesday which is when i plan to test it out, have a canoeing group at work. 

Finished paddle
Concept
As for the Pyrography work i wanted something different from your standard original maple leaf, after i bit of browsing on the net i found something like the one on it but with a few changes .

Hope you enjoy, because I'm very proud of this one.

As normal thanks for reading, 

Paul


Wednesday 23 May 2012

Cedar- Beavertail ... Birch Bark

Hey everyone ,

Still here ! Sorry for the disappearance.

If the formats weird it's because I'm posting from an iPhone so I'll fix it later when I'm home.

I started the cool painted shaft paddle I was talking about earlier in this blog. It's a my first time working with cedar. Few things you remember quick when working with this wood.... How good it smells, how light it is and how easy it is to "dent" it . when I was craving it I left the whole thing a little thicker in the shaft to make it a bit strong. Cedars soft and light wood. I'm a bit worries I'll get out on the water and snap it if I thin it down to much.


I also added an epoxy tip to the paddle . I use the same method as Mark shows on his blog found here.

I shaped the shaft, thinned the blade down much more then the original blank. If you add the tip to the original blank then thin it down, its just a lot of wasted epoxy. To add the tip ensure you have the shape or the blade you want . Then make a horse shoe with the play dough or soft magic mold (this is what I used) press the paddle in and pull it out . Mark the amount you want the tip to be the remove that amount of wood. When u place the paddle back in there should be a perfect gap for the epoxy to fill and will be what the tip looks like .


When you mixing the epoxy someone told me to add filler so i went to my shop vac and got some sawdust to add. I used a quick 5 min epoxy and mixed it then added the dust until a watery mayo consistency. Then I scooped it into the gap and because it's " watery " , it should fill it just right.

Be sure there is no air bubbles in the epoxy. You can also add a price of rope into the tip to make stronger ( Marks suggestion) , I could wait and there was no good rope around .

Then peel the play dough off and start shaping your paddle !

Think I covered everything so far.

Thanks for reading and now I'm off to the cottage to go canoe and get some fishing in !

Happy Victoria day weekend

Paul